Showing posts with label Sally Hansen. Show all posts

Thursday, April 25, 2013

Twinkle Twinkle Little Star

Welcome dear friends to what happens to be my 100th post!

Just like on my actual birthday, I don't want to get too serious - instead, let's have some fun looking at some nail art I did last night that I am unbelievably proud of.

I got a little bottle of blue holo stars from the discount store down the road weeks ago, swearing I was going to do something nail related with them, despite not actually having used rhinestones or studs or any of that sort of thing before. They were just too freaking cute to leave there!


Tuesday, January 1, 2013

The Awesomeness of Smaug

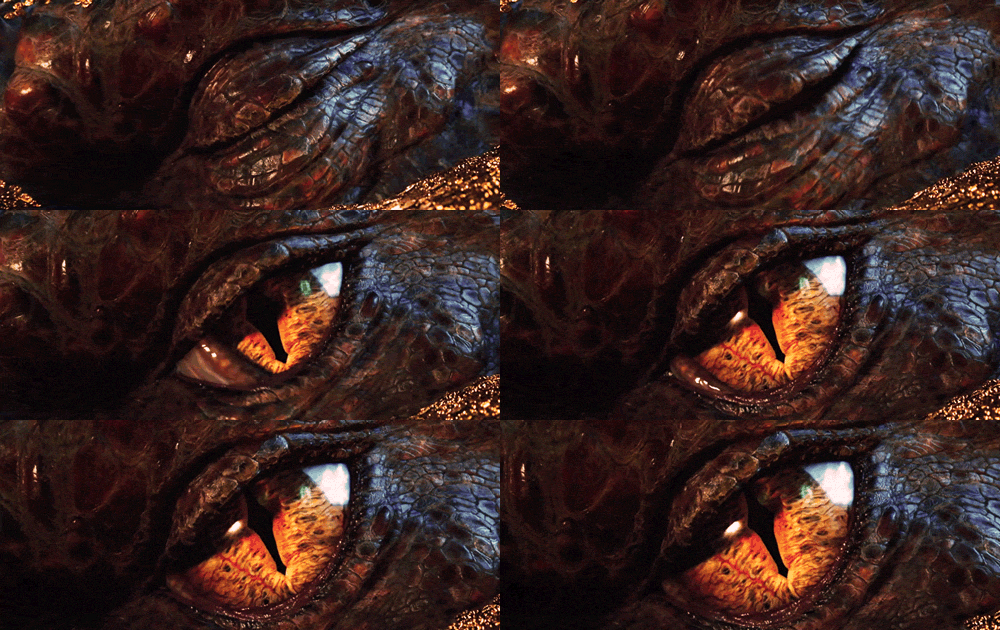
I went and saw The Hobbit the other night, and much to the dismay of almost every Tolkien fan I know, I really rather enjoyed it. I thought it was good fun, and enormously pretty - but I wasn't really expecting a totally faithful recreation. ANYWAY, the point is that my current nail obsession has reached the point that when we finally see Smaug, the great and terrible dragon, for all of two seconds right at the end, I had two thoughts. 1) COOL 2) I could do a great manicure based off that.

In case you haven't seen it yet, here is a gif of the shot I mean.

Of course there's a gif. There's ALWAYS a gif.
The camera swoops in over a huge room covered in great mountains of gold, and one of the mountains shudders a bit, sending coins flying. You get a glimpse of bluish tinged red dragon scales, and then screen fills up with a closeup of his enormous eye. It's brilliant. When they showed Smaug rolling around in his big piles of gold like Scrooge McDuck, I immediately thought of my OPI The Man With The Golden Gun topcoat. It's perfectly, delightfully decadent, and suits this image to a tee.

Happily I also have an enormous array of reddish blues, and blue tinged reds, and purpley reds because I am totally obsessed with duochromes, so it was just a matter of choosing which one screamed dragon skin. I eventually settled on Illamasqua Scarab as a nice coppery base, then put a layer of Sally Hansen Prisms in Ruby Sapphire over the top. The Prisms take foooooorrrreeeeeeeevvvvver to dry, so I almost always end up fucking them up, but they're just so damn pretty! I only put one coat over the base colour, and it still shows up as a really clear duochrome (meaning it shines different colours under different lights)

Illamasqua Scarab, courtesy Illamasqua website
Sally Hansen Prisms Ruby Sapphire, courtesy NailXchange

I then attempted to let this concoction dry by playing some Saints Row 3, but lost patience too quickly and slathered on an enormous amount of The Man With The Golden Gun. This means the whole thing has bubbled like crazy this morning, but fuck it. There is enough glitter and shit going on that I don't think anyone is really going to notice some bubbles. Anyway, that's enough words, I know what you're here for - pretty pictures!

Out in the sunshine!

Inside, under a lamp

Also inside, under a lamp. I love lamp.

Inside, diffused window sunshine. I love the colour here, it looks
so dragony.

Inside, diffused sunlight. You can really see the duochrome here.

Inside, diffused light, angled so you can see the gorgeous coppery red shine.
So I'm pretty damn happy with these results. What do you think?

Saturday, December 29, 2012

How To Do Nails - Butch Edition

I am not a number, I am a free man
After some feedback on my last How To Do Nails post, it occurred to me the advice I gave wouldn't necessarily be of use to everyone who might want to play with nail polish. Not everyone can or want to grow nails as long as mine, so I thought I would put together a tutorial for those of you with what the Nailistas call "shorties".
This is my boyfriend, Alex. As you can tell, he has a pretty good sense of humour and is willing to do all kinds of silly things to amuse me. So when I said I wanted to paint some short, blunt, butch nails, he was happy to be my guinea pig. Well...maybe not HAPPY. But he let me. Maybe he was just excited to be called butch, who knows?

So this is the guide to nail polish for those of you who don't have long, strong, or femme nails, but still like to put pretty things on the ends of your fingers.


My nails on the left, his nails on the right.
The first thing you will need is nail polish, and nail polish remover. I cannot stress enough the importance of having something to take this crap OFF your nails again BEFORE you put anything on them. As for what polish to choose, I don't really have any different advice for this edition. Quick drying options are always better for first timers, and the Sally Hansen Insta Dri brush is a miracle for those of us with shaky, clumsy, or simply unpracticed hands.

When it comes to a topcoat and a basecoat, and whether you need them, there are only two questions you really need to ask yourself. Do you want it to last a couple of days? If yes, get both. If no, don't worry about it. Do you really need to make sure it will come off cleanly and not stain your nails? If yes, use a basecoat. If no, don't worry about it.

If you've got short nails, you will also most likely have pretty overgrown cuticles, so you will probably need a round wooden stick with a slanted end called an orange stick to push them down and out of the way of the polish. My boy's cuticles are halfway up his nail, and it drives me a little crazy, so I was pretty excited to have the opportunity to do something about them. You want to get a little hand cream, or sorbolene and rub it into your cuticles first so they don't split when you start messing with them. If you don't have anything like this around the house, I imagine a teeny bit of olive oil would do just fine. You just want something to lube up the skin a bit, and make it nice and soft.

This does hurt a little bit, so be gentle. Unless you're me, then enjoy
the whimpers of your guinea pig.
Then you get your orange stick and slide the pointed end under the cuticle like so. Just keep pushing it all back until you have a little ridge, and then rub the ridge with your fingertip to get it soften it up some more. Keep doing this until your nails look like this;
Ahh, that's better.
Don't fuss too much about getting it all perfect and neat, because it's not going to be. Just try and free up as much real estate as possible for the polish. Once you've done this, you'll need to get out your nail polish remover and a cotton bud.

Dip your cotton bud in the nail polish remover, and swab the actual nail. This is to get rid of any cream/oil that is sitting on it from softening up your cuticles. If you leave the oil there, unfortunately the polish will slide right off.
Now, it's time to get polishing! As I said in my previous edition, don't stress about getting outside the lines. Everyone does, and I'll show you how to clean it up after.
Once you've slopped it on, leave it alone for at least ten minutes. I wouldn't have thought I would have to add this before today, but after wrenching my boy's hands away from his face every five minutes I feel like I should also add that you shouldn't huff the fumes. It's not going to kill you, but you'll likely end up with a killer headache.
Once the polish is completely dry, or you've completely run out of patience, get your polish remover and cotton buds out again. This time it's also helpful if you have a little dish of some sort to pour the remover in. I like to use metal jar lids - plastic lids can be hit and miss, because acetone melts an awful lot of plastics and you never really know which ones it will destroy until it's sitting in a steaming puddle on your carpet.

 Once you've got this set up, dip the cotton bud in the remover and rub it along the edge of your nail. It helps if you can get the hand of pulling the skin back from the side of your nail while you're doing this, so the skin is sitting a little away from the nail. This means you're less likely to take the polish off the actual nail. because short nails are a different shape to longer ones, they're actually a little easier to clean up. Usually you only need to rub in two lines - across the top of the nail, and then in a little semi oval around the bottom of the nail.


Because these particular nails have been bitten quite badly, I wasn't too fussy about taking all the polish off every bit of skin across the top - I concentrated more on making a pleasing shape from a distance. Once you're happy with it, throw a quick dash of topcoat over it if you're wanting it to last without chipping. And then, we're all done!

Look at that hand model form! He's a natural.

Eeeexcellent...

Not bad all, if I say so myself. I'd love to see the results if any of you end up trying out this guide!


Friday, December 14, 2012

Unrelated Writings

Just a quick update today while I work on some other projects in the background.
I've had a short article published on The Peach, an up and coming Australian site geared towards the female perspective, and if you're interested in knowing what I think about people with "weird" fetishes, head on over and take a look. It's nothing to do with beauty products of any kind, and the content is M rated, hence why it's there and not here - but, I'm still pretty proud of it. 

And if you're just here for pretty pictures, please placate yourselves with my manicure for today - Illamasqua Baptiste with Sally Hansen Prisms Ruby Sapphire and Max Factor Fantasy Fire over the top. I think playing "how many colours can I see on my nails?" will keep me entertained for the rest of the day. 


Thursday, December 13, 2012

How To Do Nail Polish

There are a lot of nail and makeup blogs around that will tell you how to do things "right". The right shape to make your nails, the right colours to wear together, the right silhouette for this season - I'm not that kind of blogger. This isn't that kind of guide. This is for those of you out there who might have looked at nail polish, or girls with amazing nails, and thought, "That looks fantastic, but I couldn't do that." This guide is to tell you that yes, you absolutely can.

I always like to encourage people to try nail polish if they are wanting to experiment with femme, but they're not entirely sure about it all. You're never too fat, or too plain, or not fashionable enough for pretty nails - not that I think anyone is ACTUALLY too fat for any fashion you choose. But it can be hard to convince your inner critic of that sometimes. Not so with shiny, shiny nails - literally ANYONE can pull it off. There is such a staggering variety of colours and finishes and glitters and shimmers that there HAS to be one out there that suits anyone. So first of all, take a deep breath, and chill out. Don't worry if your nails are short, or bumpy, or your cuticles aren't neat enough, or if you have callouses. If you want to try nail polish, just do it. No-one will ever look at it as closely as you do, unless you're actually a nail blogger posting macro pictures of your manicures. I know it might feel like everyone can see that smudged spot where you pushed hair out of your eyes before the polish was totally dry - I know, because I've worn polish that's totally smudged to my eyes, and all anyone has said (if they say anything) is, "Oooh, shiny!" So fuck it, let's go.

STEP ONE 
Set reasonable expectations
Before you even start, come to terms with the fact your finished product will NOT look like The Swatchaholic's manicures. Remember my review of Cirque's polish, Fascination Street? Here is one of her swatches of the same polish.
 See how much mine suck in comparison?


But it's okay to suck in comparison. Don't let that stop you, because honestly, there are about five people anywhere who are as good as her. Just do what you can do, and you can clean it up when you're done. You shouldn't miss out on the incredible variety of shiny available in nail polish just because you're not the best of the best.

STEP TWO
Obtain nail polish
The cheapest possible way to do this is to contact a nail obsessed friend, and ask if they will lend you something. They will almost certainly be delighted to help you out, because sick obsessions love company, and nail addicts are some of the most obsessed people I've ever come across. (Keep in mind for a sense of perspective that I'm living with a Batman fan).
If you don't know anyone with nail polish lying around, you want to hit up your local chemist. There are some incredible polishes available online, but if you haven't tried it before, you want to start with something cheap and easy. (like me! Ha ha, couldn't resist) My go-to recommendations for absolute novices are the Sally Hansen Insta-Dri collection, or the Revlon Top Speed collection. Both are available in a wide range of colours at just about any chemist, and cost around ten bucks. They are both really consistent across the whole range, so you can just pick whatever colour you like and know you won't have to muck about to make it sit nice and smooth.

Here are some pictures so you can look this up on your phone and compare it to what's on the shelf.

As an optional extra, you can also pick up a base coat and top coat. Nothing is going to go horribly wrong if you don't, but if you want to wear nail polish on a regular basis, both of these will make sure you get the best out of your polish. Which of the astonishing variety of each product is the "best" is a subject of fierce and intense debate, so here are the two I use. I got them from The Nail Shop, which I want to jam in there because their customer service was just fantastic. Plenty of communication, posted really quickly, and they threw in a nail file and some teeeeny tiny diamantes as a free sample. So, you know, check them out.

INM Clear Bond base coat = $8.75
Out The Door top coat = $10. 95
I used to have a real problem with nail polish peeling off my nails in one great sheet after about half a day, which annoyed the piss out of me, and naturally didn't really encourage me to try nail polish more than about once every six months. But once I started using this base coat, it's not a problem anymore.
Out The Door is currently my quick dry top coat of choice, but I haven't actually tried any others. I read that some of the other oft-recommended brands can get gluggy halfway through the bottle, and I thought, to hell with that. This one does the job (ie allows my nails to dry in the 2.5 seconds I can refrain from fiddling with things), hasn't gotten gluggy and gross on me yet, and if you go to The Nail Shop they have a trial size available, in case you're only wanting to dip in a tentative toe.

STEP THREE
Obtain polish remover
Even if you decide to only go with polish alone, you'll need something to take the polish off again once you're done. Unless you want to go all natural and organic and find non-acetone remover, everything else is more or less the same. Acetone, which is the ingredient in most nail polish remover that does the actual removing, is not particularly good for you, so don't drink it or huff it. Oh, and try and keep it out of cracks in your skin because it hurts like you wouldn't believe. Not that I would know from experience.

This is my polish remover. There are many like it, but this is mine.
Now you can't just dunk your nails in a bowl of this stuff, so you'll need something porous to dab it on with. There are specific lint-free nail wipes available, but I get by with plain old cotton balls and cotton swabs.

Don't put these in your ears once they have polish remover on them.

STEP FOUR
Put the polish on your nails
I'd like to pretend I have a really careful way of doing this, but I don't. I just slop it on. I TRY to do this thing where you dab a drop in the middle of your nail right down the bottom, then sweep it to either side and up, because it comes out a bit neater. But most of the time, I just slop it on. The great thing about the Sally Hansen Insta-Dri for novices is that the brush is HUGE. You only have to paint, like, two stripes maximum to cover your whole nail. If you were careful, you could probably do it in one. This is awesome, because it gives you very little room to fuck it up. Some of the other polishes I've tried have tiny narrow brushes, which is super unhelpful when you're not very good at making it even, because every time you have to stroke the brush over your nails is another chance for you to make a big streaky mess.
If you're anything like me, the finished result will look something like this;


STEP FIVE
Hold Still
This is absolutely the hardest of all steps for me. I use fast dry nail polish, and a fast dry top coat, and I still inevitably end up dragging a hair through it, or dinging them on SOMETHING. Unfortunately one of my favouritestest polishes ever HAS to be allowed to dry slowly, so I had to figure out a compromise between my fidgety nature and my love of things shiny. Turns out X-box is a fantastic stop gap solution!

I call this the Nerd Grrl Position
So long as you're careful to keep the fingers curled under the controller from touching each other, playing a quick round of Halo or Borderlands is a fabulous way to keep your mind off your nails. You can twiddle the joysticks and pull the triggers perfectly well with just the pads of your fingers, so you've got something to entertain you AND you're keeping your grubby fingers off things until they're dry.

STEP SIX
Clean up
This is where your cotton and caustic chemicals come in. As you can see, even with our expectations set nice and low, my polish always looks like shit until I clean it up a bit. There is a really neat trick I learned from Natalie Dee, where you dip a cotton swab in nail polish remover and kind of scrub it around your cuticles to get rid of the really big fuck ups. But if you're bored already, don't sweat it.
I usually leave it overnight to "cure" - I know, I know, it's kind of gross to think about a chemical cocktail "curing" on your nails, but it really is much easier to mess about with it the next day. In the morning, I just wash my hands with soap and water, and scritch the excess off where I don't want it to be. The soap makes it come off your skin really easily, and I would take a guess that leaving it overnight probably allows the oils in your skin to seep out under it as well.There is lots of advice around about how to clean it up properly (some of it involving tiny brushes), but for an absolute beginner, soap and water is fine. You don't want to be fucking around all day with something that might annoy the crap out of you after an hour.
Once your're done washing, we're done!

Voila!
 Try not to mess with it for the first day, and see if you like it. Don't fret if you've smudged it, or chipped it, or it's not sitting perfectly symmetrically. Here is a picture to illustrate how other people will actually see your nails in an every day setting.

Yes, I am always holding coffee
Looking at this picture, do you notice that there is a little bubble in one of the nails? Can you tell the thumb is actually painted a little unevenly? Of course not, and neither will anyone if you go out with nail polish applied as inexpertly as mine are.

But more importantly, while you've got in on, have a think about how it makes you feel. If you're going to go to all this effort, you want to get something out of it, right?

Does it make you feel gross, like there's something on your skin you can't get off? You can actually feel nail polish to a certain extent because your nail has a great many nerves running under it, and for some people this sensation is creepy as hell - in which case, nail polish isn't for you.
Does it not really make you feel anything at all? Is it just a patch of your body that is inexplicably a funky colour? Then nail polish probably isn't for you either. But hey, you tried it, and that's the important thing.
Does it make you feel a little girly, and somehow, inexplicably fancy? Then you're like me, and you've just discovered one of the most accessible parts of femme fashion. There are millions of cohorts out there more than happy to drag you into their shiny, glittery, holographic world. Congratulations!